SONOPHONE®
Spray Applied Acoustic Plaster
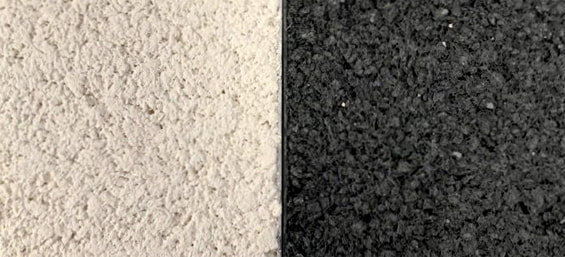
Sonophone® is a spray-applied acoustic plaster specially designed for interior sound absorption applications. Sonophone provides an attractive white surface.
Sonophone is a cementitious spray-compound that requires only the addition of water on the jobsite to form consistent pumpable slurry.
It is ideal for new construction, repair or remodeling work. It may be applied over gypsum panel, concrete base coat plaster on steel surfaces. Uses include convention centers, schools, education and religious facilities.
FEATURES AND BENEFITS
- Aesthetically Superior uniform seamless finishes available in a variety of textures and colors.
- Excellent Surface Burning Characteristics
- Excellent Light Reflectance
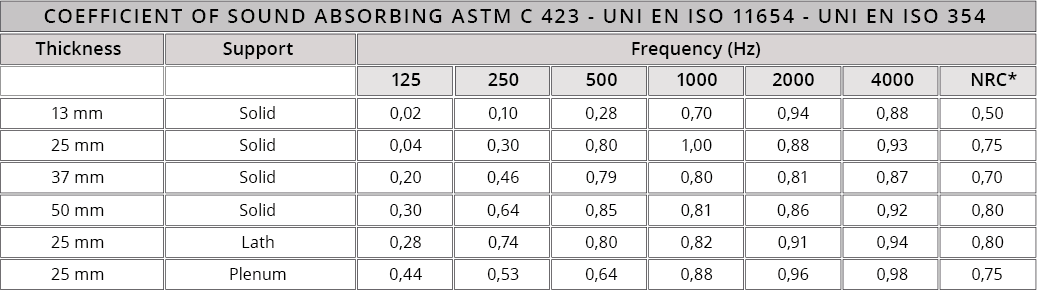
- Excellent Sound Absorption
- Fast and Efficient application
PROPERTIES
| PROPERTY | VALUE | NORM |
|---|---|---|
| PROPERTYColour | VALUEWhite, black | NORM |
| PROPERTYPackaging | VALUEBags of 20,5 kg | NORM |
| PROPERTYDry Density | VALUE368 kg/m³ | NORMASTM E605 |
| PROPERTYWind Erosion | VALUE0,003 g/m² | NORMASTM E859 |
| PROPERTYAdherence Resistance | VALUE1173 kg/m² | NORMASTM E736 |
| PROPERTYCompressive Strength | VALUE0,17 Mpa | NORMASTM E761 |
| PROPERTYFire Reactivity | VALUEA1 | NORMUNI EN 13501-1 |
| PROPERTYConsumption | VALUE4–4,5 kg each cm of thickness according to the surface irregularity | NORM |